Introduction
I was considering consolidating some equipment in my home lab. I wasn’t happy with the Surveillance Station software offered by QNAP and recently switched to a different NVR solution. This allowed me to repurpose my QNAP TS-251 for other tasks. I wanted to determine if the QNAP TS-251 could replace my existing pfsense SG-2220 Security Gateway Appliance.
One of my favorite features of QNAP storage appliances is is the built-in hypervisor – QNAP Virtualization Station which allows you to run virtual machines on your appliance.
Based on the hardware the TS-251 seemed like a perfect candidate for pfsense. Here are the specs for the TS-251:
| CPU | Intel Celeron J1800 dual-core 2.41 GHz Bay Trail D |
| RAM | 8GB |
| Ethernet | (2) Intel WGI210TA |
I decided to create a virtual machine on my QNAP TS-251 to run pfsense, below are the steps I followed.
Configuration
First, you will need to download the latest version of pfsense. I used 2.3.2-RELEASE (amd64) from pfsense.org/download

Once I downloaded the .ISO installer I uploaded it to a shared directory on my QNAP TS-251 where I store all of my .ISO files.
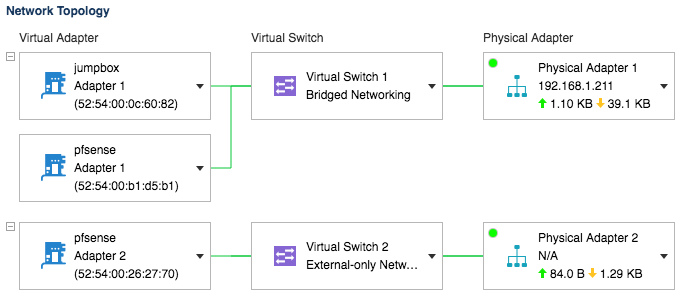
Configure Physical Networking – The QNAP TS-251 has two physical network ports. I connected one of the network ports (Physical Adpater 2) to my Cable Modem and the other (Physical Adapter 1) to my Cisco 3560CG-8PC-S Gigabit PoE Switch.
Configure Virtual Networking – Next I logged into my QNAP TS-251 and opened Virtualization Station 2.2 (Beta). I clicked on Network Setting in the left menu bar and configured my Network Topology as follows:
Create a New Custom VM -In the left menu bar I selected Create VM then in the middle pane I chose Create Custom VM.

Note: I choose the settings above because I wanted to compare the performance to the virtual machine to my pfsense SG-2220 hardware appliance. The SG-220 has an Intel “Rangeley” Atom C2338 1.7 Ghz CPU with 2GB DDR3L RAM. Depending on the use case, you may be able reduce CPU and Memory resources.
When creating a New Custom VM you can only select a single Network and it doesn’t allow you to select the Device Model. After creating the virtual machine immediately go to Virtual Machine Settings. Choose Add Device and make sure that this Network Adapter 2 Mode is Virtual Switch 2 and the Device Model is Virtual Gigabit Ethernet (VM Driver Required)

Install pfsense – Now we are ready to install pfsense. Attach the .ISO to the virtual machine, then power it on.

During the installation I chose the Quick Easy Install and used the Std Kernel. The WAN and LAN adapters are auto-detected – it appears as though it looks for the adapter that has DHCP and auto-assigns that as the WAN port.

If the adapters are em0 and em1 instead of vtnet0 and vtnet1 then you forgot to change the Device Model to Virtual Gigabit Ethernet.
After the installation completed I attempted to ping the LAN interface 192.168.1.1 from my test machine.
Troubleshooting Tip: If you are unable to ping the LAN port after installing there is a good chance that you switched the interfaces. Open the console of the VM and choose option 1 to Assign Interfaces properly.
Performance Tests
Testing Equipment:
- MacBook Pro Retina 15-inch, Mid 2014
- 2.2 GHz Intel Core i7
- 16GB 1600 MHz DDR3
- Thunderbolt Network Adapter connected to a Cisco 3560CG-8PC-S Gigabit PoE Switch
- https://www.timewarnercable.com/en/support/speed-test.html
There were two settings that had a significant impact on performance:
- Hardware Checksum Offloading
- Device Model Selection
During my initial testing I found that my download speed was awful 2.72 Mbps, that is not a typo it was 2.72 Mbps after multiple tests. Checking the box to Disable hardware checksum offload restored my download speed to 255.53 Mbps.
Open a web browser connection to http://192.168.1.1 and logged in as admin with password pfsense. From the top menu select System –> Advanced –> Network and then select the check box to disable Hardware Checksum Offloading.

When I originally installed pfsense I used the Device Model Intel Gigabit Ethernet and although it provided a respectable download speed of 84.74 Mbps, switching to the Device Model Virtual Gigabit Ethernet provided the best download speed at 255.33 Mbps.
In addition to conducting several performance tests I was also curious about CPU utilization. I monitored CPU Utilization during testing and found that utilization rates were relatively high spiking anywhere from 40% up to 60% during most tests.
Conclusion
As a result of the lower throughput, and potential risk to the performance of other applications running on the QNAP TS-251, I decided to keep my pfsense SG-2220 appliance. The SG-220 is silent, has a low power footprint, 6-9 watts during runtime – and provides outstanding performance.
Throughput – The pfsense SG-220 Security Gateway appliance is capable of download speeds of in excess of 350 Mbps consistently in my environment. Although the pfsense virtual machine peaked at 255.53 Mbps I could not reliably reproduce that download speed, download speeds ranged from 160 – 255 Mbps when using the virtual machine.
Performance – During the download speed tests I found that the CPU Utilization on the QNAP TS-251 spiked to 60%. I continue to use the QNAP TS-251 for other applications, the increased CPU overhead of the pfsense virtual machine could impact performance of those applications. Although the SG-2220 also had higher CPU utilization rates during testing it is a dedicated appliance and does not impact the performance of my other applications

Hello,
I am doing the same thing and I already had the device configured as you have before I found this post but I’m not sure on how to connect it to the internet.
How was your pfsense VM connected to the internet? Did you configure the WAN settings in pfsense or was there a modem/router in between?
I’m a little confused by the QNAP wording, for example, when you set the interface to External-Only, the IP address of the interface is set to 0.0.0.0, so if you are using a bridged modem/router (as I do on ADSL) or direct ethernet WAN, does the ISP assigned IP address over ride the 0.0.0.0?
Damon, I connected one physical interface from my QNAP TS-251 directly to my Time Warner Cable modem using a CAT6 Crossover Cable. It leased a DHCP address from my cable modem.